





Rest Day Workout: My Go-To Active Recovery Routine
A rest day workout involves doing low-intensity activity on a scheduled rest day to help your body recover. These “workouts” can include things such as walking, mobility, gentle stretching and foam rolling. These gentle movements keep you consistent, and rest days are when the progress from strength training actually happens. A rest day isn’t an “off day.” It’s an important part of a regular workout schedule.
Today I’m going to show you a rest day workout you can do at home. It’s split into two parts, standing mobility and foam rolling, and each part has a follow-along video.
Quick Links:
- What Is a Rest Day Workout?
- Benefits of Active Recovery
- What to Do on a Rest Day
- Standing Mobility Routine
- Foam Rolling Routine
- FAQs
What Is a Rest Day Workout?
A rest day workout, or active rest day, is easy, low-intensity movement on a day off from hard training. This kind of active recovery helps ease muscle stiffness and lowers your risk of injury, performance drops or burnout.
Unlike passive recovery, which is a time of complete rest without any physical exertion, active recovery allows your body to rest by still doing light movement such as walking, yoga or light swimming. Active recovery is best when your body is experiencing the normal soreness expected from training. However, if you have experienced an injury, physical trauma or illness, a passive recovery might be something to consider.
Benefits of Active Recovery
- Improves circulation and increases blood flow to tired muscles, which supports muscle repair.
- Eases muscle stiffness and soreness.
- Improves mobility and range of motion.
- Gives your nervous system a break.
- Keeps up the habit of moving every day as part of your fitness routine.
What to Do on a Rest Day
- Walking: Keeps your body moving with a natural range of motion while not putting too much strain on your muscles. Walking is accessible and also supports your nervous system.
- Light Cardio: Gets blood flowing to ease stiffness without adding the kind of stress that slows your recovery.
- Stretching and Mobility: Eases tight muscles and keeps your joints moving through their full range of motion. It can take as little as 15 minutes.
- Foam Rolling: Reduces muscle soreness, improves blood flow and helps to calm your nervous system.
- Yoga: Stretches tight muscles and helps you relax. Gentle Pilates works well here, too.
Want one routine that covers mobility and foam rolling? Here’s the rest day workout I do.

Rest Day Workout Details
Workout Equipment
- A Foam Roller
- A Mat (Optional)
Workout Instructions
You can do Part 1, Part 2 or both parts of this workout, depending on how your body feels and how much time you have. The key here is to keep the effort easy and the intensity low.
Part 1:
Each exercise in Part 1 is going to be done for around 40 seconds followed by a 20-second transition that takes you straight into the next move.
Part 2:
During Part 2, you will do each rolling exercise for around 50 seconds followed by a 10-second transition into the next move. For the moves that work one side at a time, roll both sides.
Part 1: 10-Minute Standing Mobility Routine
Part 1 is an all-standing flow of mobility work and dynamic stretching with no equipment necessary. You will move through all 9 moves with 40 seconds of work and a 20-second rest, one time through with no repeat. Keep every move slow and gentle.
1. Good Morning and Baby Backbend
Targets: Hamstrings, glutes, lower back, chest

- Stand with your feet hip-width apart and a soft bend in your knees.
- Push your hips back to hinge forward with a flat back, then stand tall and place your hands on your low back for a gentle backbend.
- Keep the backbend small and let your eyes follow the movement.
2. Calf Raise and Tib Raise
Targets: Calves, shins, ankles

- Press up onto the balls of your feet, then lower with control.
- Next, rock back onto your heels and lift your toes toward your shins.
- Keep the movement smooth as you alternate between the two.
3. Wide Squat Shoulder Drop
Targets: Inner thighs, hips, shoulders, upper back

- Start in a wide stance with your toes slightly turned out and your hands on your thighs.
- Sink into a low, wide squat, then drop your right shoulder toward your left knee as you rotate through your upper back.
- Return to center and repeat on the other side.
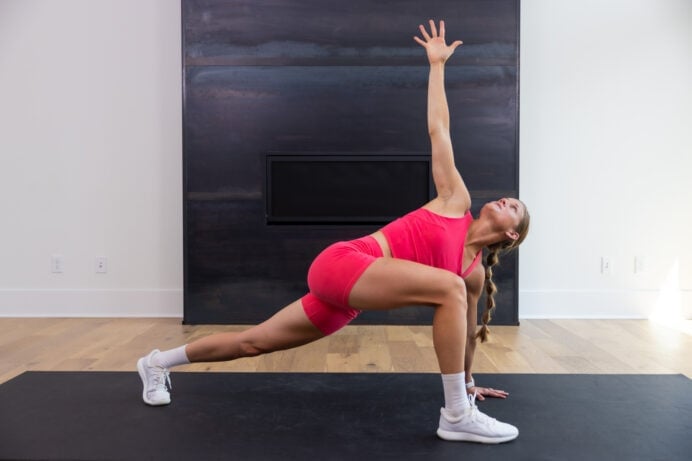
4. Lateral Squat and T-Spine Rotation
Targets: Inner thighs, hips, upper back

- Shift your weight into one leg and bend that knee, keeping the other leg straight and your hips back.
- Reach one arm up and rotate through your upper back, then return to center.
- Shift to the other side and repeat.
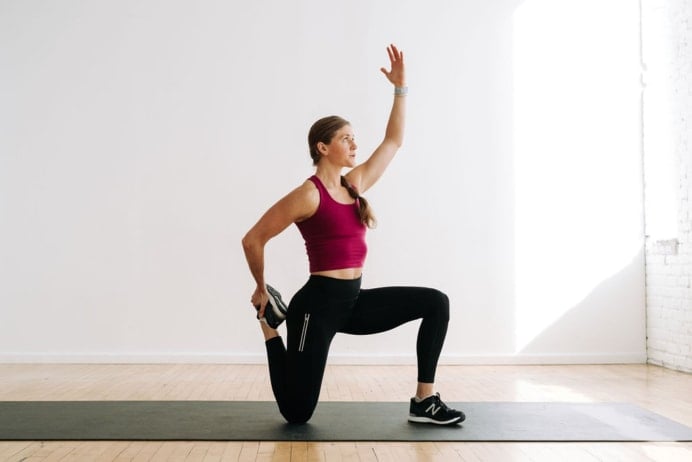
5. Standing Quad Stretch and Hinge
Targets: Quads, hip flexors, hamstrings, balance

- Stand on one leg and hold the opposite foot behind you, keeping your knees close together.
- Squeeze your glutes to feel the stretch in the front of your thigh.
- Then hinge forward from your hips with a flat back.
6. Standing Shoulder CARs
Targets: Shoulders, upper back

- Stand tall with your feet hip-width apart and brace your core to make sure your torso stays still. Place your hands gently behind your head, elbows wide. Squeeze your shoulder blades together to activate your upper back.
- Straighten your elbows, extending your arms out to the sides. Both arms should be at shoulder height, palms facing away from you.
- Rotate your palms to face the back of the room, then bend your elbows, bringing your hands behind your back (backs of your hands touching your lower back).
- Return to the starting position by straightening your elbows, then rotate your palms, bending your elbows, ending with your hands behind your head.
7. Standing External Hip Rotation
Targets: Hips, glutes

- Start in a standing position with your feet shoulder-width apart and core engaged. Option to place one hand on a wall or chair for balance support.
- Shift your weight to your left leg, maintaining a soft bend in your left knee.
- Bend your right knee to 90 degrees, lift it in a large circle, bringing your knee hip towards your hip, and slightly rotate the knee outward as you lower it behind you. I like to imagine I’m stepping over a chair or stool to get a full range of motion.
8. Standing Figure 4
Targets: Glutes, outer hips, lower back

- Start in a standing position with your feet hip-width apart and your core engaged.
- Shift your weight onto your left foot, keeping a soft bend in your knee.
- Lift your right foot and cross it over your left thigh.
- Let your right ankle rest above your left knee as your right knee points to the side forming a “figure 4” shape.
9. Standing Cat/Cow
Targets: Spine, upper and lower back, core

- Start in a standing position with your feet shoulder-width apart and your core engaged.
- Place your hands gently behind your head with your elbows wide.
- Squeeze your shoulder blades together to activate your upper back then lift your chest and chin towards the ceiling and arch your back to find cow pose.
- Open through the chest and exhale to find cat pose, rounding your spine, tucking your pelvis under and letting your head and shoulders gently roll forward.
Part 2: Foam Rolling Routine
Part 2 of this recovery session focuses entirely on foam rolling, which works like a self-massage for tight muscles. You will go through these moves with 50 seconds of work and a 10-second transition time. Roll slowly, breathe and ease off on spots that are more tender.
10. T-Spine Upper/Mid Back Roll
Targets: Upper and mid back

- Place the foam roller horizontally and lean back so the roller sits just below your shoulder blades.
- Interlace your fingers behind your head and keep your knees bent and feet flat on the floor as you take a deep breath and gently arch your back over the foam roller.
- Hold this for a few seconds and then move the roller up and down along your spine pausing on any particularly sore spots.
11. T-Spine Flexion/Extension
Targets: Upper back, chest

- Lie on your back and place a foam roller right around your shoulder blades.
- Support your neck with your hands as you inhale and arch your back over the roller then exhale and crunch forward into a shallow flexion.
12. Lat Roll
Targets: Lats, side body
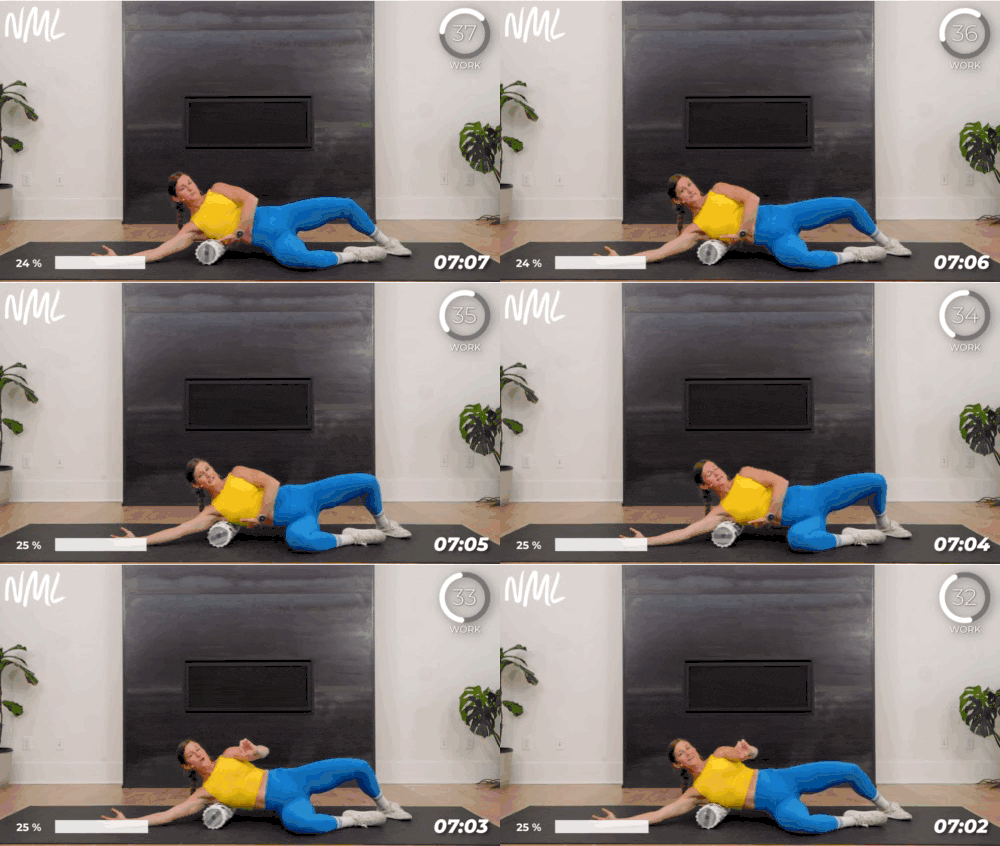
- Lie on your side with your arm straight above your head and your palm facing forward.
- Place a foam roller on the floor horizontally, right under your armpit.
- Keep your chin tucked, core engaged and free hand balancing you as you slowly roll from your armpit down to your ribcage at a controlled pace.
- If you find any “sticky” spots, take a deep breath and pause on them to help release some of the pressure they’re holding.
13. Hip Flexor, Quad and TFL Roll
Targets: Hip flexors, quads, outer hips

- Lie face down, position the foam roller under the top section of your thigh and support your upper body on your elbows as you slowly roll from the top of your thigh all the way down to right above your kneecap.
- Then turn slightly onto your side to roll your outer hip (TFL).
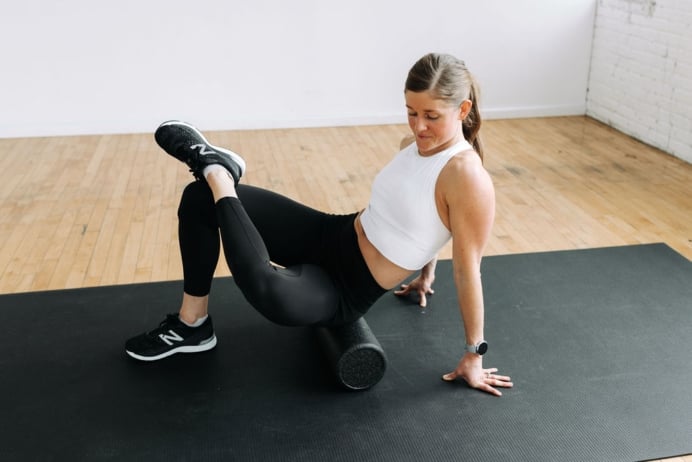
14. Piriformis Figure 4 Roll
Targets: Glutes, piriformis

- Sit on top of the foam roller, lean back and let your body weight rest on your hands behind you.
- Keep both knees bent with your feet flat on the floor.
- Lift your right ankle and position it over the opposite knee in order to make a “figure 4” shape.
- Then slightly tilt your body toward your right side and shift your weight deep into your glutes, then use your foot to slightly roll back and forth a few inches.
15. Calf Roll
Targets: Calves

- Sit with your legs extended, place a foam roller under one calf, just above your ankle and position your hands behind you to keep you balanced.
- Lift your hips slightly off the ground and allow your body weight to fully rest on the roller.
- Then move your body up and down from your ankle to the back of your knee, moving your toes to hit different muscles.
16. Frog Rock with Hands on Foam Roller
Targets: Inner thighs, hips

- Start off on your hands and knees with the foam roller horizontally on the floor in front of you, then place both hands or wrists on top of the roller.
- Move your knees outward into a comfortable frog-like position, keeping them bent at approximately 90 degrees with your feet flat and pointing outward.
- Lightly engage your core and keep your spine neutral as you slowly rock backward until you feel a light stretch.
For more uses for your foam roller, check out this list of my 8 favorite foam roller exercises!
How Many Rest Days Do You Need?
Most people find that 1-2 rest days per week work well for them. This depends on your training volume and experience. If your goal is to build muscle, give each muscle group about 48 hours before you train it hard again. My programs have rest days built into them to remind you just how important they are as you go!
Just a few options include my Push Pull Legs Workout Challenge, my 3-Day Workout Split. You can find more options in my guide to the best workout splits. Or see how I lay out a full training week in my weekly workout plan for women.
FAQs
Is it okay to work out on a rest day?
Yes! It is absolutely okay to work out on a rest day, as long as you are keeping your movements low-impact and gentle in order to prioritize your muscles’ rest. Save HIIT and heavy lifts for your training days.
What should you not do on rest days?
During rest days, you should not do hard workouts or high-intensity workouts. You should not drastically decrease your calorie intake, skimp on hydration or pile on other stress that keeps your body from recovering. And don’t ignore signs that you actually need full rest.
How many rest days a week do you need?
People usually find that 1-2 rest days a week are sufficient, whatever their fitness goals. If you’re focused on building strength, rest days are when your muscles adapt.
Can you do mobility exercises on rest days?
You should do mobility exercises on rest days! They promote circulation to help your sore muscles and help maintain your range of motion and prevent stiffness.
Does yoga count as a rest day?
Yoga can count as a rest day, depending on the type of yoga that you choose to do. As long as it is low-intensity and doesn’t put too much strain on your muscles, a yoga session can be perfect for your rest day. The same goes for gentle Pilates.
Should I take a rest day even if I’m not sore?
Yes, you should still take a rest day even if you find that you’re not sore. Just because your body doesn’t feel sore doesn’t mean that it isn’t tired or could use a day to recover. Rest also plays a big role in preventing injury, especially overuse injuries from training the same muscles day after day.
Make Rest Days Part of Your Plan
Remember, rest days aren’t a break from your training. They’re a very important part of it.
If you are interested in a full program that schedules rest and active recovery days for you, let me introduce you to my 12-Week Workout Plan. I hope to see you there soon!
More Workouts
RecoveryPin This: Rest Day Workout

This post includes affiliate links. I do earn a commission for products purchased using these links (at no additional cost to you). Thank you for supporting Nourish Move Love, making the content you see on this blog possible.
no comments
Leave a Comment