


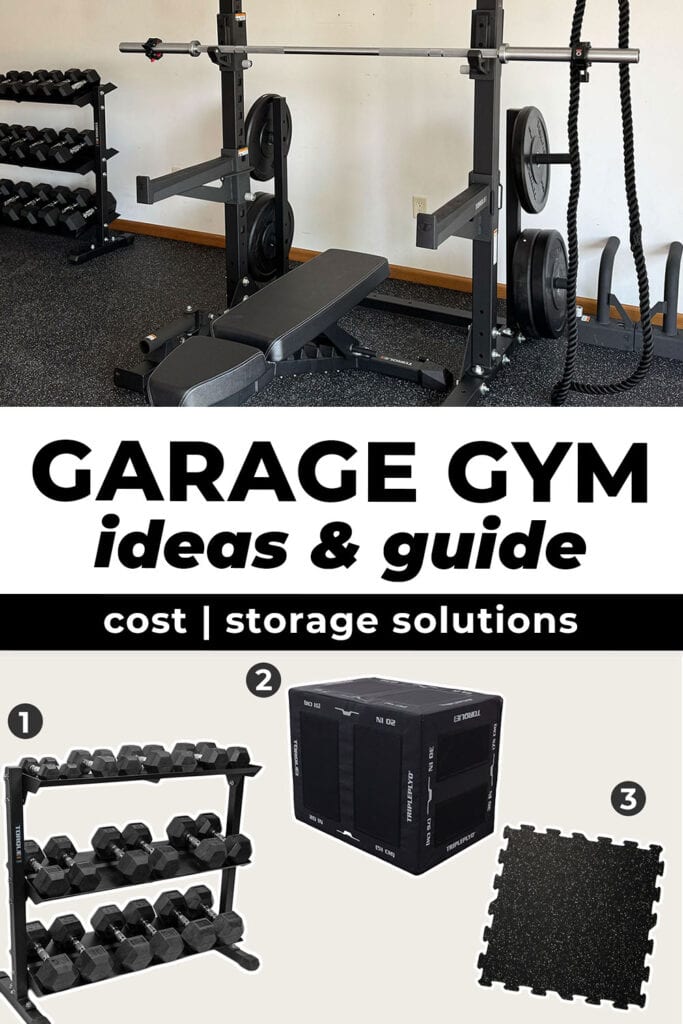
Building the Best Garage Gym: Everything You Need to Know
Stay fit at home with these garage gym ideas for home athletes! Whether you’re looking to invest in some basic home gym equipment to jumpstart your fitness journey or are ready to take things to the next level with a full garage gym build-out, this is everything you need to know.
This guide is brought to you in partnership with Torque. All words and opinions are my own. Thank you for supporting the brands that make Nourish Move Love and all the content you see on this blog possible.
Quick Links:
- Benefits
- Considerations
- Garage Gym Costs
- Deciding on Your Training Style
- Recommended Equipment
- Storage Tips and Solutions
Garage gyms exploded in popularity during the 2020 pandemic – and many people who made the switch to working out at home full-time (myself included!) swear they’ll never go back.
I recently converted part of our garage into the home gym of my dreams, and it’s made a huge difference in my consistency and motivation levels during my workouts. If you’ve always dreamed of having a home gym but struggled to find the right space in your house, I highly recommend considering the idea of a garage gym.
BUILD YOUR GARAGE GYM
Garage Gym Equipment
I’ve been in the fitness space for over 10 years, and this is hands down some of the best equipment I’ve come across. Use code NML5 for a discount!
Discount Code: NML5
Benefits of Building Your Own Home Gym
Building a home gym has been a game-changer for my consistency, but that’s not the only perk that’s made the investment worth it for our family:
- Time Savings. Skip the commute and avoid waiting around for equipment to open up.
- Long-Term Cost Savings. Eliminate recurring gym memberships and pricey boutique class fees.
- Total Flexibility. Train on your schedule: no need to work around a gym’s hours or class times.
- Family-Friendly. No babysitter? No problem. Fit in a workout during naptime without leaving the house.
- Increased Motivation. Having a dedicated workout space can make you more excited to train and help shift your brain into a working mindset without leaving home.
- More Consistency. Fewer barriers = fewer missed workouts. When access is easy, sticking to a workout plan becomes more realistic.
Considerations
Before building a garage gym, there are some things you should consider to ensure your space is safe and functional for your needs:
- Space and Layout. Take measurements of your garage and map out how much space you’ll realistically need for your workouts. Make sure to consider ceiling height (especially for overhead lifts or pull-up bars), door clearance, and storage space for equipment when it’s not in use. A general rule of thumb for comfortable garage gym sizing is 8’x10’ for a basic garage gym (dumbbells, kettlebells, etc.) and 10’x10’ (if including a squat rack and barbell). I recommend a ceiling height of over 8’ for overhead movements.
- Budget. Costs of building a garage gym vary wildly depending on how much equipment you’re investing in. On the most cost-effective end, you could outfit a garage gym for under $100 by searching Facebook Marketplace and secondhand stores for used dumbbells. Additions like a squat rack, mirrors, custom lighting or a sound system will increase your costs. I recommend starting with the basics (dumbbells, a plyo box or bench and flooring or a yoga mat) and going from there.
- Ventilation & Temperature Control. Garages can get hot in the summer and freezing in the winter. Consider a fan, dehumidifier, space heater or portable AC unit to make the space comfortable year-round. I also recommend installing a carbon monoxide monitor if the garage shares air with vehicles or gas appliances. When possible, work out with the garage door open or cracked to increase airflow.
- Flooring. Concrete isn’t the most comfortable for floor work or high-impact exercises. Invest in rubber mats or stall mats to protect your joints and your equipment.
Garage Gym Costs
The price to build out your garage gym can vary dramatically based on what equipment you choose, where you live and if you’re able to source anything secondhand. Here are some general guidelines of what to expect in terms of pricing:
- Starter Gym ($150-$600): Used dumbbells, mat/rubber tiles, and resistance bands.
- Intermediate ($600-$1800): Add bench, plyo box, additional dumbbells, kettlebell, etc.
- Advanced ($1800 – $3500+): Add squat rack, barbell, bumper plates and collars, rack attachments, cable machines, cardio machines, etc.
Deciding on Your Training Style
Before you start buying equipment or rearranging your garage, it’s important to define your training style: AKA, how you actually like to move. This will help you make smarter decisions about what gear to invest in, how much space you’ll need, and how to organize your setup for maximum efficiency.
- If you love heavy lifting, prioritize dumbbells or a squat rack and barbell.
- If you love HIIT or circuit training, make sure you have plenty of open floor space and proper flooring to protect your joints during bodyweight exercises like squat jumps and burpees.
- If you love yoga or mobility work, consider investing in soft lighting and high-quality yoga mats to make your sessions more enjoyable.
Recommended Equipment: The Essentials
There are a few pieces of basic gym equipment I recommend for every home gym. These allow you to perform a wide variety of workouts safely and effectively.
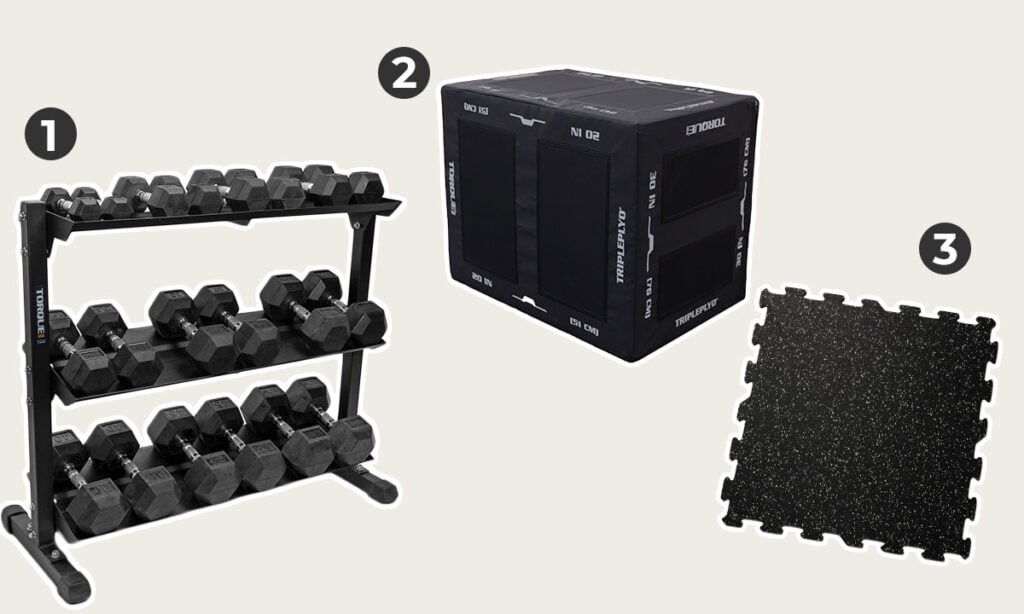
1. 4’ Universal Storage Rack With 5-50lb DB Set
A dumbbell set with a storage rack (discount code: NML5) is a compact and functional piece of home gym equipment that supports a wide range of strength training exercises. The rack keeps weights organized, accessible and off the floor, making your workout space safer and more efficient.
This setup is designed for strength training, allowing you to perform everything from bicep curls and shoulder presses to goblet squats and renegade rows. With a variety of weight options (increasing by 5lb intervals), it’s ideal for progressive overload, drop sets, supersets and scaling workouts to your current fitness level.
Whether you’re new to strength training or have been working out for years, dumbbells are a staple in any home workout routine. This is the first thing I would recommend investing in!
2. Triple Plyo Box
A Triple Plyo Box (discount code: NML5) (also called a 3-in-1 plyometric box) is a soft, rectangular piece of training equipment made from dense foam. It’s designed for explosive movements like box jumps, step-ups and elevated strength exercises. The “triple” refers to the 3 different heights it offers (20″, 24″, and 30”) — depending on how you position the box, you can access 3 levels of intensity in a single piece of equipment.
You can use a plyo box in many different ways:
- Strength training: Chest presses, hip thrusts, tricep dips, Bulgarian lunges and more.
- Cardio: Box jumps, burpee jumps, step-ups and up-and-overs.
- Modifications: Placing your hands on a box during push-ups/planks is a great option for beginners and pregnancy/postpartum.
I prefer soft-sided plyo boxes over wooden boxes to reduce the risk of shin injury from missed jumps.
3. Ecore Flooring
Ecore Athletic Rubber Flooring (discount code: NML5) is a high-performance rubber gym flooring solution designed for home and commercial gyms. It’s designed to protect your joints and your floors by offering shock absorption, sound insulation and slip resistance.
Whether you primarily do strength training or cardio, I recommend some type of protective floor mats as the base of your garage gym. It protects your subfloor from dropped weights, reduces noise and provides a slightly-cushioned non-slip surface for all different types of workouts.
Each tile is 8mm thick and 23″x23″. They’re easy to install and lock together to provide you with a safe and durable surface for lifting weights or HIIT workouts. The tiles are sold individually, so you can customize for your unique space by ordering the exact number you need.
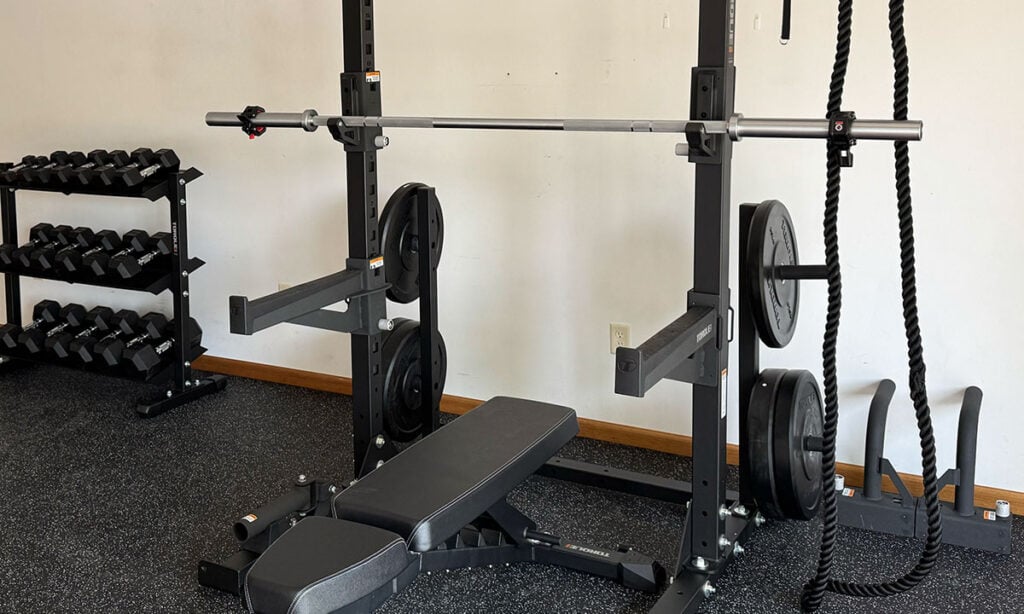
Recommended Equipment: Squat Rack & Accessories
When you’re ready to upgrade your home gym beyond the basics, this is what I would invest in next!
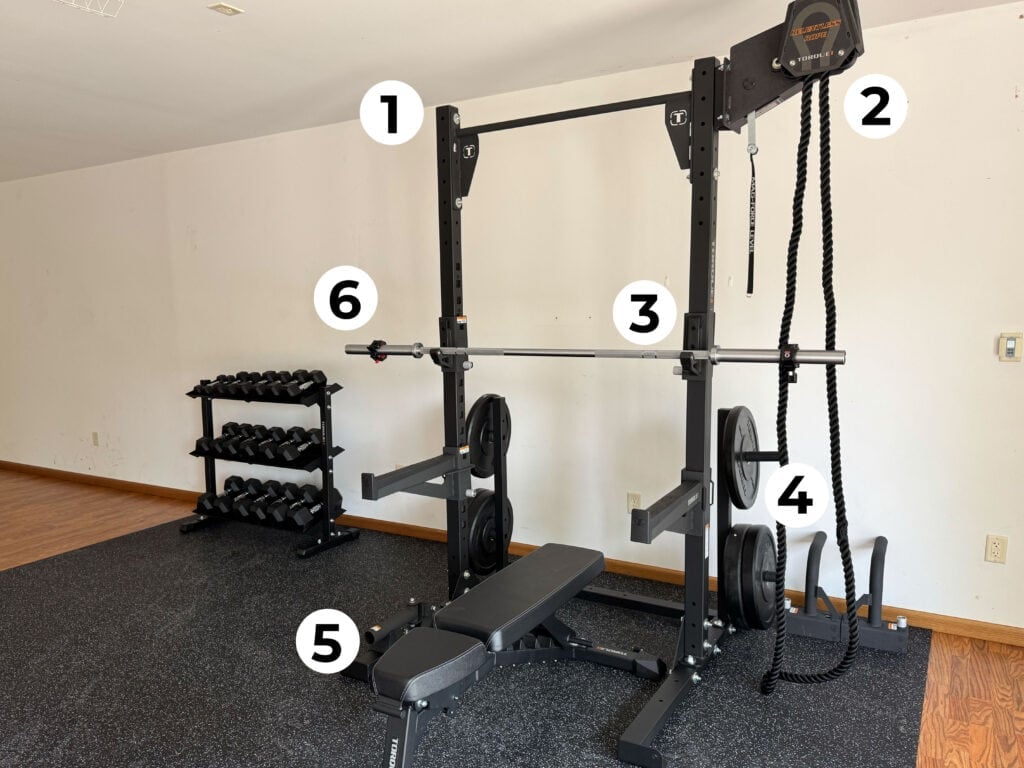
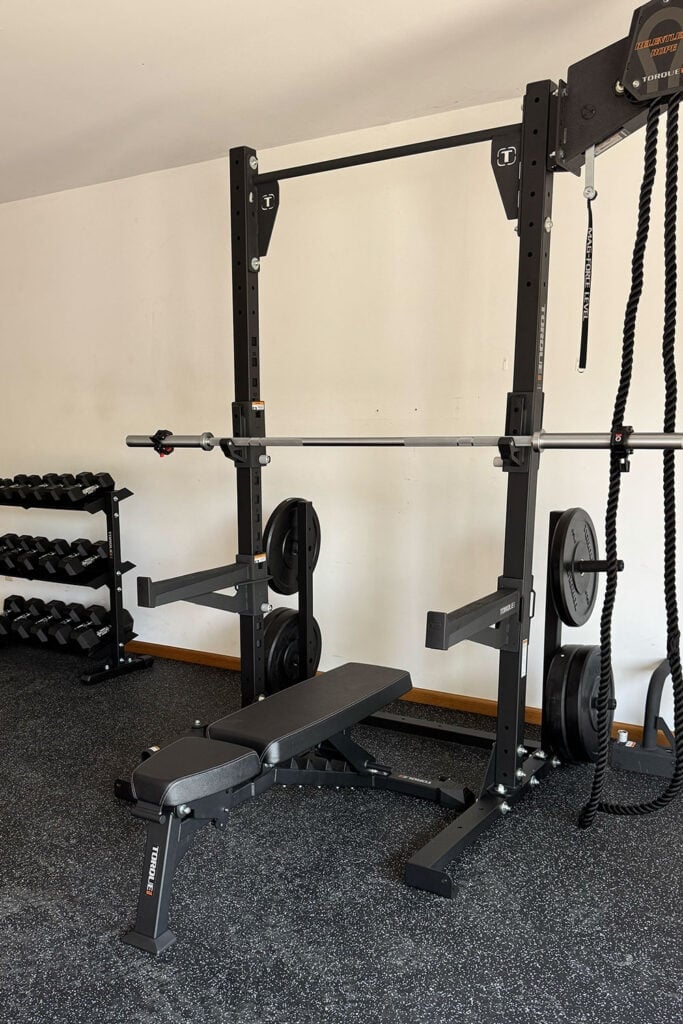
1. High Squat Rack With Landmine
A High Squat Rack (discount code: NML5) is a sturdy steel frame designed to support barbell lifts like squats, bench presses and overhead presses. I customized my squat rack by adding a landmine attachment (a pivoting sleeve that holds one end of a barbell for rotational and multi-planar training) and spotter arms (for safety).
This setup is built for full-body strength training. The high squat rack provides a safe and stable structure for weightlifting, while the landmine attachment allows for rotational and unilateral exercises like landmine squats/lunges and landmine presses/rows.
A squat rack will typically be the largest piece of equipment in your garage gym, and the most important thing to measure for the perfect, functional fit. The rack I have is 93″ (7.75 ft) from top to bottom, which still allows plenty of clearance for my garage door. If you don’t have space for a whole squat cage or power rack, you can use a squat stand.
2. Relentless Rope Trainer
The Relentless Rope Trainer (discount code: NML5) is a compact mounted rope resistance trainer that simulates the movement of a battle rope pull, sled drag or rope climb. It provides a continuous resistance as you pull the rope through the device, making it ideal for upper-body conditioning, grip strength, core training and full-body endurance work.
I personally love this CrossFit-inspired piece of equipment because it makes cardio more enjoyable. This is a great space-saving alternative to traditional battle ropes, as well as cardio machines like a treadmill, bike or rowing machine.
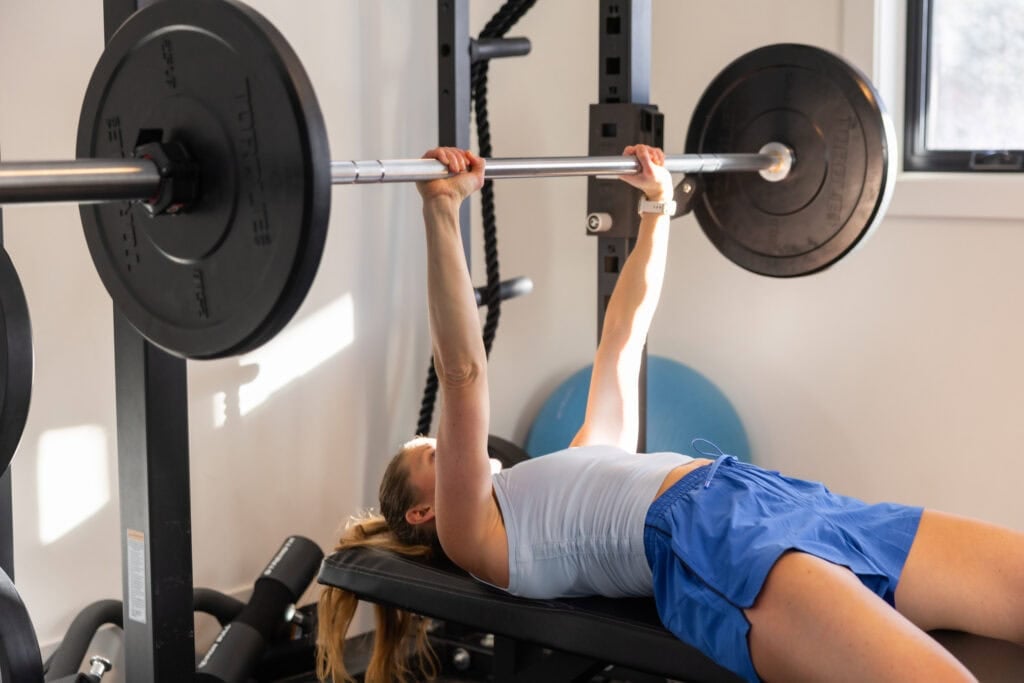
3. Barbell Bar
A barbell (discount code: NML5) is a long, straight steel bar used primarily for powerlifting and strength training exercises like squats, deadlifts, bench presses and overhead presses. It’s designed to be loaded with weighted plates on either end and is one of the most versatile pieces of equipment for building full-body strength.
Barbells are ideal for compound lifts (exercises that recruit multiple muscle groups at once). They encourage progressive overload (gradually increasing weight over time), which is essential for gaining strength, building muscle, and improving performance.
4. Bumper Plate Package
Bumper Plates (discount code: NML5) are weight plates made from dense rubber and designed to be slid onto the ends of a barbell. I prefer bumper plates over traditional iron plates because they can be dropped safely and decrease risk of damage to your floors.
Most bumper plate packages include pairs of plates ranging from 10lbs to 45lbs. I like to have both lighter plates (for upper body movements like cleans and presses) and heavy plates (for lower body movements like squats and deadlifts).
5. Bench
A flat-incline bench (discount code: NML5) is an adjustable padded platform used for a wide variety of strength training exercises. It provides a stable surface for seated, inclined, or lying-down movements (such as chest presses, skull crushers, shoulder presses or leg raises).
If you’re investing in a squat rack, a bench is the next logical piece of foundational gym equipment to prioritize. A flat bench (discount code: NML5) is typically lighter and more affordable, while an adjustable bench is more versatile and sturdier. Most adjustable benches come with wheels, making it easy to slide out of the way when not in use.
6. Barbell Collars
Barbell collars (discount code: NML5) are a small but essential piece of gym equipment if you have a barbell. Also known as barbell clamps or clips, barbell collars are used to secure weight plates on a barbell and prevent them from sliding or shifting during lifts.
These are a key safety feature for any barbell lifts, especially those involving explosive or dynamic movement like cleans or snatches. Collars also keep plates stable and even during heavy lifts like squats and chest presses.
Storage Tips and Solutions
It’s easy for the garage to become the “dumping ground” of a house. Keeping your garage gym tidy and organized is key to making the space functional, particularly if you also share garage space with a car or other storage boxes.
Vertical storage works especially well in small spaces for keeping your equipment organized and off the high-demand floor space. I recommend investing in wall-mounted racks or pegboards for plate storage and shelving or storage bins for items like resistance bands. A clutter-free gym makes for a more enjoyable, focused workout.
If you are willing to get more creative, you can make use of limited space by installing overhead storage racks, DIY-ing PVC tubes to hang yoga mats or barbell sleeves, or installing recessed shelves between studs.
You can also save space by being intentional with the pieces of equipment you invest in. Equipment like free weights and kettlebells take up much less room than a full power rack. A plyo box can be used in many different ways, reducing the need for additional equipment. If you don’t have space for a full dumbbell rack, try adjustable dumbbells. The goal is to make this space functional for you and your needs!
Start Building Your Dream Garage Gym
If you’re dreaming of making your weekly workouts more accessible and convenient, a garage gym can be a game-changer.
I recommend starting small with a few dumbbells and a mat, then building towards a rack and barbell as your fitness levels and goals grow. With intentional planning, you’ll have a motivating, convenient setup that fits your life and your budget.
Step-By-Step Guide To Creating Your Garage Gym
- Measure available space (noting ceiling height/door rails).
- Determine your training style (this will help you decide whether to focus on strength training, conditioning, mobility or pilates zones and equipment).
- Choose flooring (rubber tiles, horse stall mats or yoga mats).
- Evaluate your climate and ventilation needs (fan/dehumidifier, space heater or AC unit).
- Start with essentials (dumbbells, flooring, yoga mat, plyo box/bench).
- Add larger pieces (squat rack, barbell, plates, bench, cardio machines).
- Organize equipment (plate pegs, pegboard, overhead bins).
Fitness Info
Fitness EducationPin This: At-Home Garage Gym Inspiration
This post includes affiliate links. I do earn a commission for products purchased using these links (at no additional cost to you). Thank you for supporting Nourish Move Love, making the content you see on this blog possible.
4 comments


Love this! I’ve naturally been inspired by your workouts to invest in many of these items already ❤️ One question though… right now I have two gorilla yoga mats stacked on my basement cement floor. I haven’t had any joint pain but am still wondering if I should invest in additional flooring mats to prevent future injury. Thoughts?
Hey Julie! So glad to hear this! And great question – if you have 2 mats stacked on top of each other, that thickness is probably about the same as more traditional flooring mats. If you’re not experiencing pain and the stacked mats work for you, I’d say no problem in sticking with them! -Lindsey
what is your opinion on bowflex system over free weights or barbells?
Hi there! I haven’t used the Bowflex. I get all of my equipment from Torque Fitness and love to have free weights and barbells available – that’s everything I need! -Lindsey