


6 Pelvic Floor Exercises
This pelvic floor workout targets the muscles that support your core, posture and overall stability, helping improve strength, coordination and breath control for everyday movement. It’s designed to build a strong, supportive foundation without high-impact exercises, making it ideal for beginners, those returning to fitness or anyone looking to strengthen their pelvic floor safely and effectively. The routine includes controlled, functional movements like 360 breathing, dead bug variations, planks and quadruped exercises that emphasize alignment, connection and long-term strength.
When I talk about pelvic floor exercises, I’m not just thinking about doing a few quick Kegels and calling it a day. I focus on building a strong, responsive system that connects your pelvic floor with your breath and deep core. In my experience, one of the most effective places to start is with 360 breathing and a gentle pelvic floor connection. Learning how to fully relax on the inhale and softly lift on the exhale is a great foundation for a strong pelvic floor. That foundation makes every other movement, like dead bugs or plank variations, so much more effective.
I always cue this work to feel subtle and intentional, not forced or overly tense. I think about allowing the pelvic floor to lengthen as I inhale, then gently engaging as I exhale, and then layering that into slow, controlled movements. This is how I train the body for real life, whether that’s picking up kids, getting back into workouts or just feeling stronger and more supported throughout the day.
Consistently working on pelvic floor strength can make a big difference in things like bladder and bowel control, especially postpartum or after periods of high stress on the body. I’ve also seen how this kind of training can help support pelvic organ health by improving the strength and coordination needed to better manage pressure through the core.
Beyond that, the benefits carry into everything. I notice better core strength, improved posture and more stability overall. It’s not about doing more — it’s about doing the right exercises with the right connection, so the strength I’m building actually translates into everyday life.
Read A 5-Star Review ⭐⭐⭐⭐⭐
“2 years postpartum and I totally forgot what a difference core breathing makes before starting an ab workout!! This was such a well-rounded workout, thank you for all you do to strengthen and empower women (especially us moms).”
— Megan R.
Pelvic Floor Workout Specifics
Improve deep core stability and pelvic floor strength with these exercises.
I recommend adding deep core and pelvic floor workouts like this to your routine 1-2 times a week to improve strength and definition in the abs and core. For extra emphasis on the core, follow this 28-Day Deep Abs Challenge.
Before starting this workout, I recommend some breathing exercises to warm up and activate the correct muscles. To find your transverse abdominis muscles, fake cough. The muscles you feel ‘pop’ when you cough are your transverse abdominis muscles.
To engage them, imagine there is a string between your hip bones, and as you exhale, that string (or your TA muscles) is pulling your hip bones together. Maintain this core activation and engagement throughout each exercise. This biofeedback will help you work the right muscles during each exercise.
Workout Equipment
No equipment needed for this bodyweight-only core routine.
Workout Instructions
Follow along with the guided Pelvic Floor Workout on YouTube, led by me — your certified personal trainer, Lindsey Bomgren.
Your Workout Looks Like This:
- 6 Pelvic Floor Muscle Exercises
- Timed Intervals (40 seconds of work, 20 seconds rest; complete as many reps as you can in the timed interval)
- Perform Each Exercise x1 Set (No Repeat)
Pelvic Floor Exercises Outline
1. 360 Breathing With Pelvic Floor Connection
Targets: The deep transverse abdominal muscles (TVA) and pelvic floor muscles. These muscle groups support your internal organs, your inter-abdominal pressure system and provide stability and mobility of your lower spine.
How to Do 360 Breathing With Pelvic Floor Connection
- Lie flat on your back with your knees bent at 90 degrees and feet flat on the floor. Find your hip bones and move your fingers 1 inch inwards.
- To find your transverse abdominis muscles, fake cough. The muscles you feel ‘pop’ when you cough are your transverse abdominis muscles.
- To engage them, take a deep breath and allow your core and pelvic floor to relax. Imagine there is a string between your hip bones, and as you exhale, that string (or your TA muscles) is pulling your hip bones together.
- As you inhale, let the belly expand (let your back pop off the ground).
- As you exhale, pull the belly in tight and think about tucking the tailbone underneath you to press your back into the mat or wall.
2. Supine March and Eccentric Lower
Targets: The deep transverse abdominal muscles (TVA), pelvic floor and hip flexors. These muscles work together to support your core, control intra-abdominal pressure and stabilize your pelvis and lower back during movement.
How to Do a Supine March and Eccentric Lower
- Lie flat on your back with your knees bent at 90 degrees and feet flat on the floor, arms resting by your sides.
- Take a deep breath in, allowing your core and pelvic floor to relax and expand. As you exhale, gently engage your core and pelvic floor.
- Keeping that connection, slowly march your right foot up, then your left foot up, bringing both legs into a tabletop position (knees stacked over hips).
- From here, slowly lower both heels back down to the ground together on a 3-count, moving with control and keeping your core engaged the entire time.
- Reset at the bottom if needed, then repeat. Focus on slow, controlled movement and staying connected through your breath and deep core.
Modification: Perform an eccentric lower with just 1 leg rather than both legs.
3. Single-Sided Dead Bug
Targets: The deep transverse abdominal muscles (TVA), pelvic floor, rectus abdominis and hip flexors. This exercise also challenges core stability and coordination while supporting the lower back.
How to Do a Single-Sided Dead Bug
- Lie flat on your back with your knees bent at 90 degrees and feet lifted in a tabletop position. Extend your arms straight up over your shoulders.
- Take a deep breath in, allowing your core and pelvic floor to relax. As you exhale, gently engage your core and press your lower back into the mat.
- Keeping one side completely still, slowly extend the opposite arm and leg away from your body (for example, right arm and right leg), lowering them toward the floor with control. Only lower as far as you can while keeping your lower back pressed into the mat.
- Inhale to return the arm and leg back to the starting position. Then repeat on the same side.
- Move slowly and with control, focusing on keeping your hips stable and your core engaged throughout the entire movement.
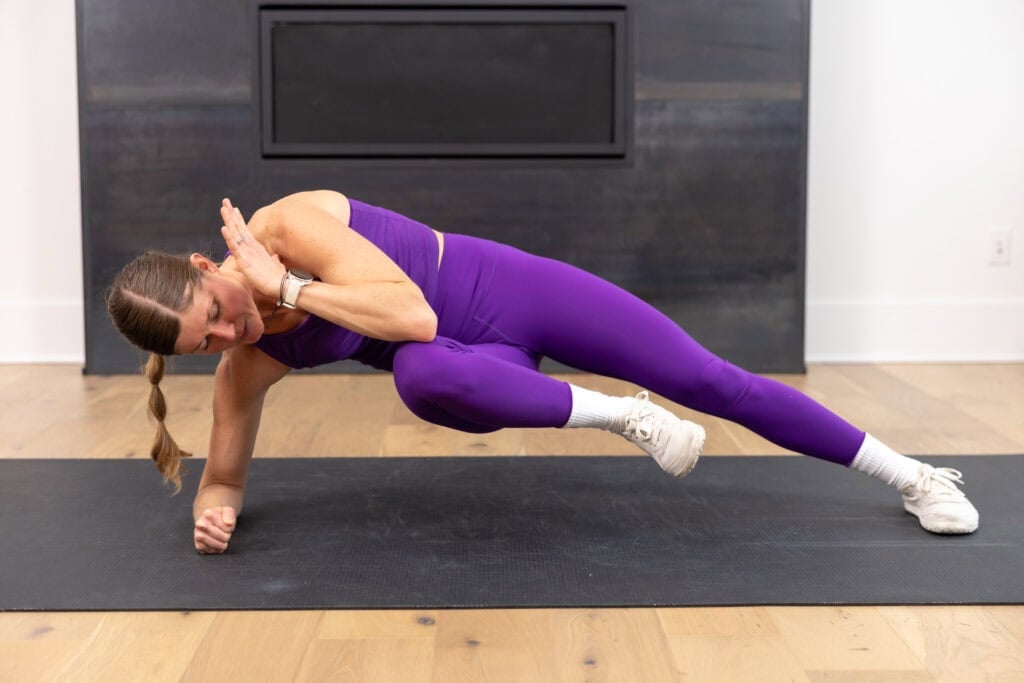
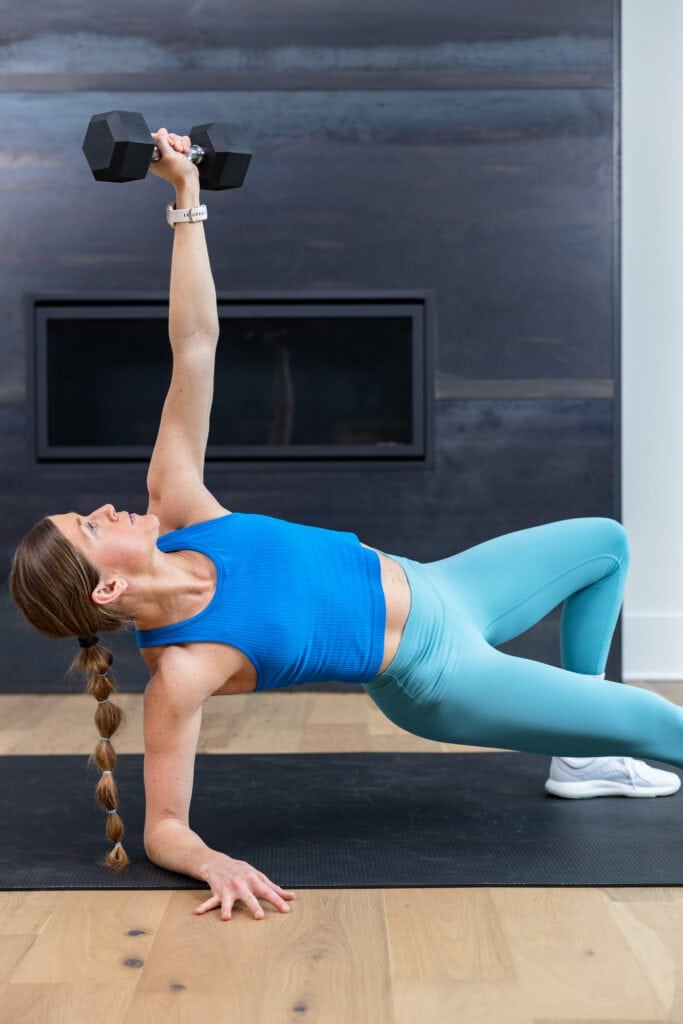
4. Advanced Side Plank Lift Offs
Targets: The obliques, transverse abdominis (TVA), pelvic floor, glutes (especially glute med) and hip abductors. This exercise builds lateral core strength and improves hip stability while supporting pelvic floor function.
How to Do an Advanced Side Plank Lift Off
- Start lying on your side with your bottom elbow stacked directly under your shoulder. Your legs are stacked, and your knees are bent at a 45-degree angle, soles of the feet to touch.
- Take a deep breath in, allowing your core and pelvic floor to relax. As you exhale, press through your bottom knee and forearm to lift your hips into a modified side plank position. As you lift, extend your top leg straight out in line with your body.
- From here, keep your top leg straight and slightly in line with your hip, then lift it up a few inches. Think of this like a controlled clamshell with a straight leg.
- Lower the leg back down with control, then gently lower your hips back to the mat.
- Repeat, focusing on keeping your hips stacked, core engaged and movements slow and controlled. Avoid letting your hips roll back.
Modification: Omit the straight leg extension at the top, performing standard clamshell lifts.
5. Modified Copenhagen Plank Lift Offs
Targets: The inner thighs (adductors), obliques, transverse abdominis (TVA) and pelvic floor. This exercise builds deep core and inner thigh strength while improving pelvic stability and control.

How to Do a Modified Copenhagen Plank Lift Off
- Start lying on your side with your bottom elbow stacked under your shoulder. Extend your top leg straight and place your top foot on the ground in front of or slightly in line with your body for support. Bend your bottom leg, bringing your knee in toward your torso.
- Take a deep breath in, allowing your core and pelvic floor to relax. As you exhale, press through your forearm and top foot to lift your hips off the ground. At the same time, draw your bottom knee up toward your body, engaging your inner thighs and deep core.
- Hold briefly at the top, maintaining steady breathing and keeping your hips lifted and stacked.
- Then slowly lower your hips back down to the ground with control. Reset if needed, then repeat.
- Focus on staying strong through your shoulder and core, avoiding collapsing through your side body, and keeping the movement controlled from start to finish.
Modification: Perform side-lying leg raises, keeping your hips resting on the ground for stability. Lift your bottom leg off the ground, then lower and repeat.
6. Quadruped Hover Lift Offs
Targets: The deep transverse abdomen muscles, rectus abdominis (six-pack ab muscles), oblique muscles, shoulders, back, legs, glutes and quads.
How to Do a Quadruped Hover Lift Off
- Start in a tabletop position, shoulders stacked over wrists and hips stacked over knees.
- Inhale, taking a deep breath as you let your belly slightly drop as you breathe through your midsection.
- Exhale, drawing your abs tight around your torso as you tuck your toes under and lift your knees 1 inch off the mat, finding a bear crawl. Hold for a 3-count.
- Inhale as you lower your knees to the mat, finding a neutral spine and returning to the starting position.
Modification: If you experience wrist pain during this exercise, try rolling up your mat a bit under your hands for additional support.
FAQs
What are the signs of a weak pelvic floor?
Some of the most common signs I look out for include stress incontinence or leaking urine when coughing, sneezing, jumping or exercising, a frequent or urgent need to use the bathroom, urinary incontinence or fecal incontinence, constipation or difficulty fully emptying the bladder, bowels, or rectum, or a general feeling of heaviness or pressure in the pelvic area. Changes in sexual function can also be a sign, along with poor core stability, low back discomfort or difficulty engaging the deep core during exercise. These signs can vary from person to person, but they often point to a pelvic floor that isn’t coordinating or supporting pressure as well as it could.
How often should you do pelvic floor exercises for the best results?
I typically recommend incorporating pelvic floor work most days of the week, even if it’s just a few minutes at a time. Quality matters more than quantity, so I focus on consistency and proper connection rather than doing a high volume of repetitions. For many people, pairing breathwork with a short series of exercises 3-5 times per week can be a sustainable and effective approach.
How long does it take to see results from pelvic floor exercises?
In my experience, some people start to notice small improvements, like better awareness, control or reduced symptoms, within a few weeks of consistent practice. More noticeable strength and functional changes often take 6-12 weeks or longer, depending on the starting point, consistency and whether the exercises are being performed with proper form and breath coordination. It’s a gradual process, but the progress tends to build over time when the work is done regularly.
When should you see a specialist for pelvic floor dysfunction?
I always recommend seeking guidance from a pelvic floor physical therapist or qualified healthcare specialist if you’re experiencing persistent pelvic health symptoms like pelvic pain, ongoing leakage, a feeling of heaviness or bulging or difficulty with bowel or bladder control. It’s also helpful to get evaluated postpartum, after surgery or if you’re unsure whether you’re properly engaging or relaxing your pelvic floor during exercise. A physical therapy specialist or healthcare professional can provide a personalized assessment and make sure you’re working on the right things for your body, based on your own health information.
Free 7-Day Ab Challenge
More Workouts
Core-StrengtheningPin This: 6 Effective Pelvic Floor Exercises

no comments
Leave a Comment