


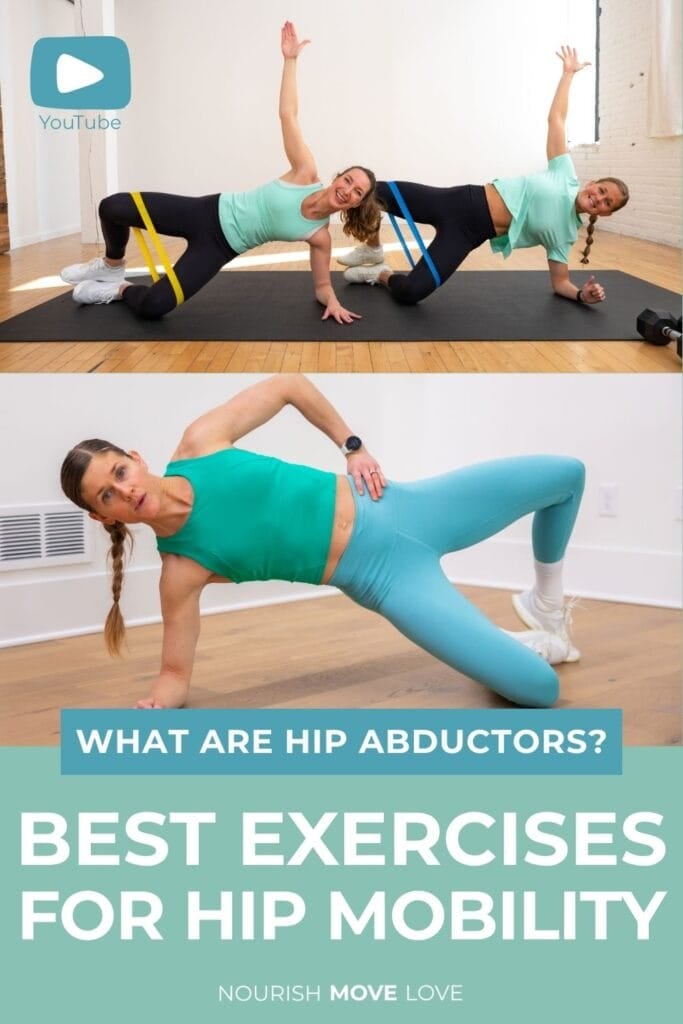
13 of the Best Hip Abduction Exercises
If you’re looking to feel more stable through your lower body or rebuild strength (especially postpartum), these exercises are a great place to start. As a mom of 3 and a trainer, I know how valuable efficient, effective workouts are. I’m sharing 13 of my go-to hip abduction exercises that you can do at home, at the gym or even on the go. They’re perfect for rounding out your strength routine or helping you rebuild a solid foundation, without needing to spend hours working out.
Strong, balanced hips – especially your abductors and adductors – are one of the most important (and often overlooked) things women can focus on in their workouts. And it’s probably not for the reason you’re thinking. While social media tends to highlight these muscles for aesthetic goals, the real benefit goes much deeper. Healthy hips and a strong lower body support better movement, reduce injury risk and play a huge role in your mobility, longevity and overall functional fitness through every stage of life.
As a personal trainer and mom, the hips and lower body are 2 groups of muscle I prioritize to maintain my baseline for functional fitness and mobility. Hip abduction exercises focus on strengthening muscles throughout the pelvic girdle, like the gluteus maximus, gluteus medius and hip flexors, while challenging muscles in the lower body, like the hamstrings, quadriceps and even the calves.
For many women, especially moms juggling work and family life, these muscle groups often don’t get the attention they deserve, creating a potential imbalance that could lead to instability or even injury.
A Brief Overview
Most of the 13 exercises can be done with or without a resistance band. The goal is to strengthen the muscle groups in the pelvic girdle to improve balance and stability through controlled repetitions.
Add lower-body strength exercises like these to your home workout routine 1-2 times a week to reach your fitness goals.
Note: If you are recently postpartum, deal with limited mobility or hip pain, be sure to consult a medical professional before adding these to your routine.
Equipment
Optional resistance band and a medium-to-heavy pair of dumbbells. I suggest anywhere from 10-30 pounds, depending on your fitness level.
Instructions
Choose 4-6 exercises from the list below. Then perform:
- Beginners: Aim for 2-3 sets of 8-10 reps
- Intermediate: Aim for 3-4 sets of 10-12 reps
- Advanced: Aim for 4-6 sets of 12-15 reps
Rest for approximately 60 seconds between sets.
Hip Abduction Exercises Outline
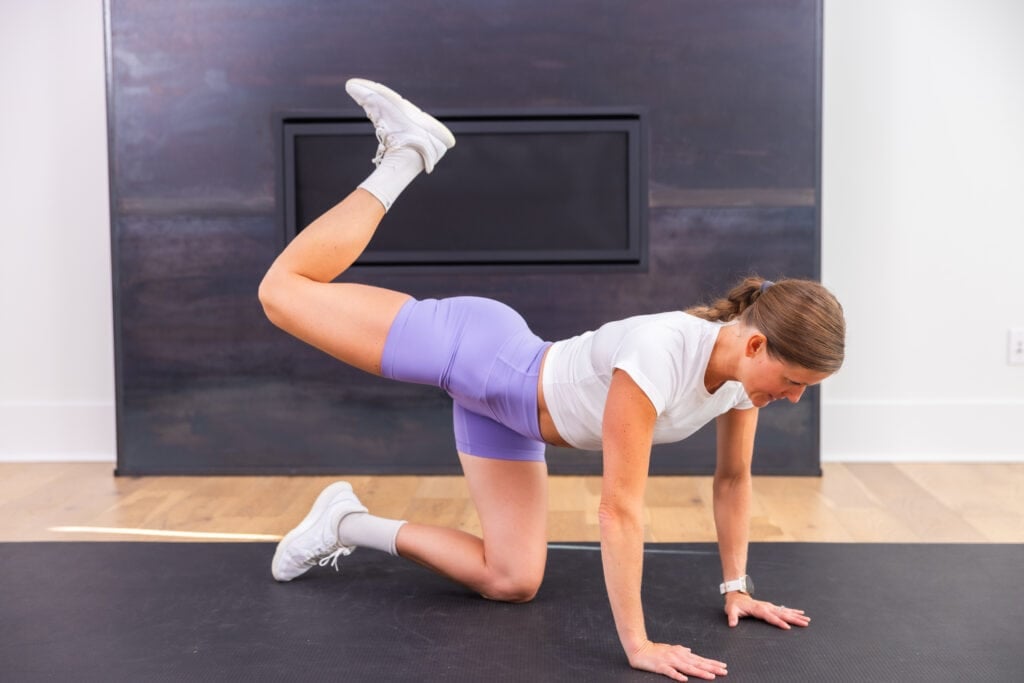
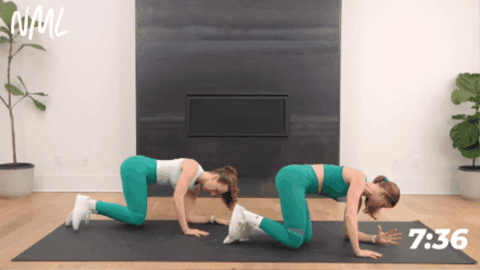
1. Hip CARs
Targets: Hip flexors, hip extensors, hip abductors and hip adductors.

How to Do Hip CARs
- Start in a table top position, quadruped on all fours, shoulders stacked over wrists.
- With control, lift your right knee, drawing a large circle with your knee from the front, out to the right side, then to the back, before lowering it to the mat.
- Reverse the motion, drawing a large circle with your right knee from back to front, before lowering it to the mat and returning to the starting position.
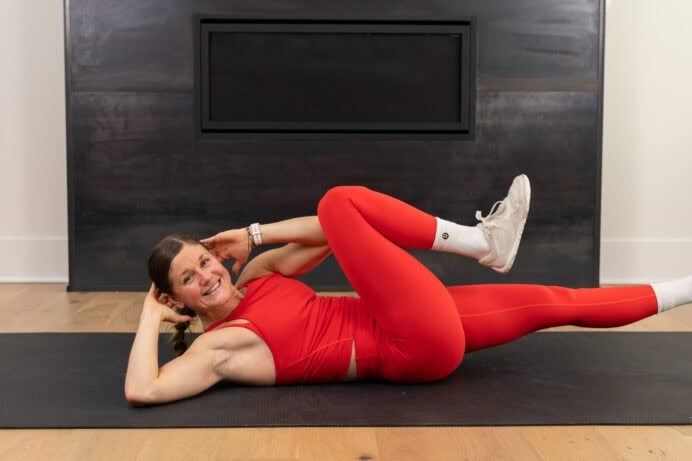
2. Banded Clamshell Lift
Targets: Gluteus medius (which lies on the outer edge of the buttocks and is responsible for stabilizing your pelvis), gluteus minimus (hip extension), obliques and core.

How to Do a Banded Clamshell Lift
- Place a resistance band about 6 inches above your knees.
- Lie on your right side, with legs stacked and knees bent at a 45-degree angle, soles of the feet to touch.
- Rest on the forearm of the lower arm, shoulder stacked over the elbow.
- Exhale to engage the core and stabilize your spine and pelvic floor.
- Open your legs, raising your upper knee as high as you can without shifting your hips or pelvis.
- At the top of the open clamshell, pause and hold for a moment. Then return to the starting position by bringing your knees together, switching sides on the next set.
Modification: Perform a standing fire hydrant with the resistance band 6 inches above your knees.
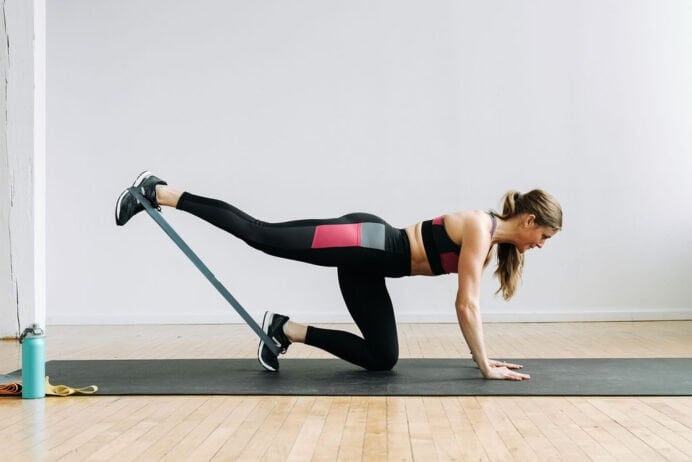
3. Banded Fire Hydrant
Targets: Gluteus maximus, gluteus medius, hip abductors and core.
How to Do a Banded Fire Hydrant
- Start in a tabletop position, quadruped on all fours, shoulders stacked over wrists and hips stacked over knees. Option to drop your left forearm to the mat for more stability. Place the band about 6 inches above your knees.
- Maintaining a 90-degree bend in your right knee, lift your right leg up away from your midline and to the side so your right knee is in line with your right hip. Left knee remains stable on the ground.
- With control, reverse the motion, slowly lowering your right knee to the ground, returning to the starting position.
4. Side Lying Leg Raise
Targets: Outer glutes, quads (top of legs) and core.

How to Do a Side Lying Leg Raise
- Start lying on your left side, hips and ankles stacked over each other.
- Keep your left leg on the mat and hover your right leg 2-3 inches above it.
- Squeezing through your outer glute, lift your right heel up a few inches, focusing on making the movement come from your muscle rather than momentum.
- With control, lower your right leg, returning to the starting position.
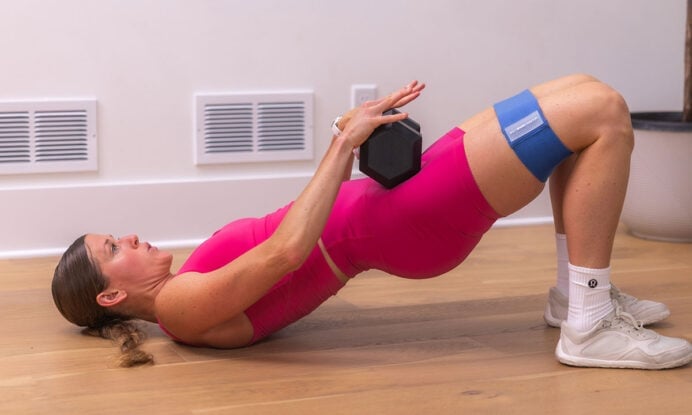
5. Glute Bridge With Abduction
Targets: Hip abductors (outer glutes and thighs), gluteus medius and gluteus minimus (upper and side glutes).
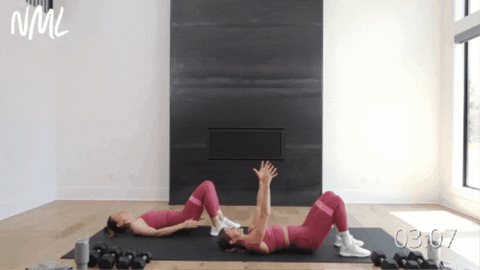
How to Do a Glute Bridge With Abduction
- Lie flat on the floor on your back with your knees bent and feet flat on the ground, feet hip-width apart. Option to place a resistance band 6 inches above your knees.
- Press through the heels to lift your hips off the ground until your knees, hips and shoulders form a straight line. This is a glute bridge. Keep your abs drawn in, belly button pulled towards the spine, so you don’t overextend your back.
- Hold your hips high at the top and press your knees away from each other, stretching the band open.
- With control, pull your knees back in, stacking them over your ankles. Then lower your hips back to the ground, returning to the starting position.
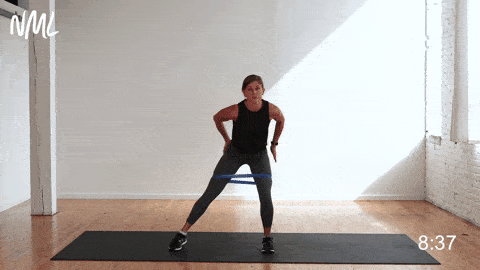
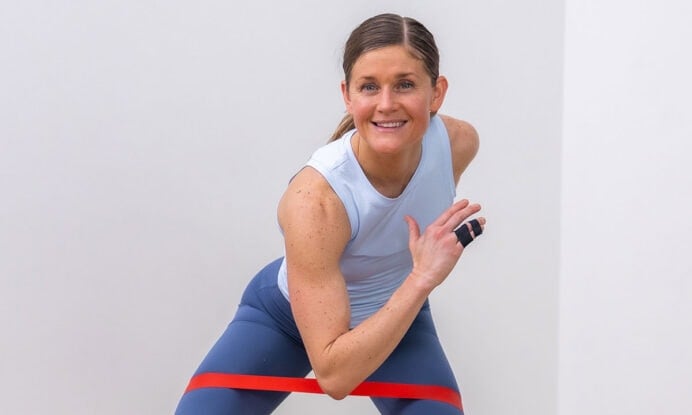
6. Banded Lateral Walk
Targets: Glutes, quads, hamstrings and hip abductors.

How to Do a Banded Lateral Walk
- Place a resistance around your thighs, approximately 6 inches above your knees. Stand with your feet slightly wider than your hips to create tension across the band (activating your glutes).
- Bend your knees to lower down into a loaded squat position. Weight in heels, chest up.
- Hold this loaded squat position as you take two lateral steps to your right, stretching the band as far as you can.
- Tap your left foot in, bringing it towards your right foot, maintaining a low squat position.
- Then, step out with your left leg, maintaining tension across the band before bringing your right leg to the left to meet your outside foot.
Modifications: This can be done without a resistance band to make it easier or with a dumbbell to make it a more strength-building focused exercise.
7. Monster Walk
Targets: Hips, hip flexors, gluteus medius, quads and hamstrings.
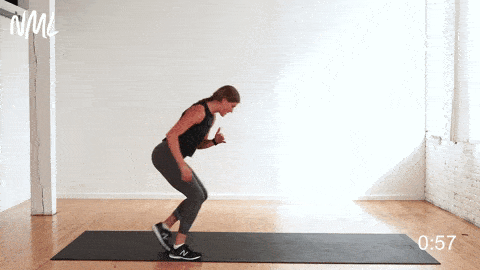
How to Do a Monster Walk
- Place the resistance band on the shin/calf area, approximately 6 inches below the knees. Stand with your feet slightly wider than your hips to create tension across the band.
- Bend at the knees to find a loaded squat position.
- Take a step forward, stepping your right foot out wide in front of you to stretch the band and create tension.
- Take another step forward, stepping your left foot out wide to stretch the band and create more tension.
- Take another step forward with your right foot and another step forward with your left foot, keeping constant tension on the band.
- Then, reverse your direction by taking steps back. Step wide each time, keeping constant tension on the band. Think of stepping as wide as your yoga mat.
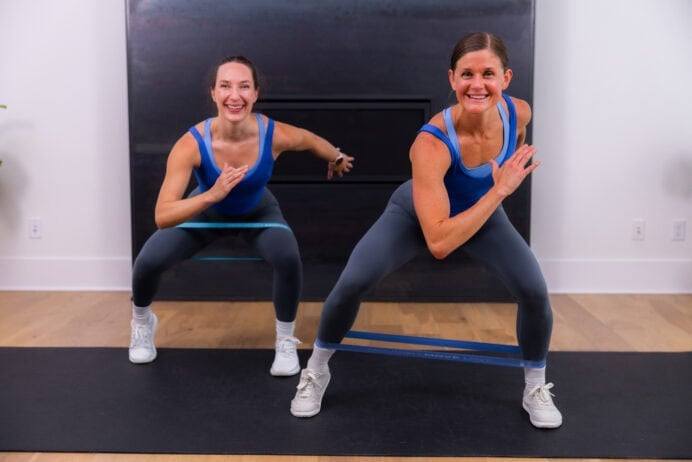
8. Banded Squat
Targets: Gluteus medius, hip abductors and quadriceps.

How to Do a Banded Squat
- Place a resistance band on your thighs, approximately 6 inches above the knees. Stand with your feet slightly wider than your hips to create tension across the band (activating your glutes).
- Sit back into a squat, lowering your hips until they are parallel to the knees. Strive for a 90-degree angle. Drop your hips down, keeping your weight in your heels and your chest up.
- Drive through your heels to return to a standing position. Squeeze your glutes at the top.
9. Banded Single-Leg Abduction
Targets: Hip abductor muscles, including the gluteus medius, gluteus minimus and tensor fasciae latae (TFL).
How to Do a Banded Single-Leg Abduction
- Place the resistance band on your thighs, approximately 6 inches above the knees. Stand with your feet slightly wider than your hips to create tension across the band (activating your glutes).
- With your knees bent, place 80% of your bodyweight on your right leg and 20% on your left foot.
- Step your left leg out, driving through the left glute to stretch the band as far as you can. Tap your left foot to the side.
- Step your left foot back into center, keeping your feet slightly wider than your hips to keep tension across the band.
- Repeat this sequence, balancing on your right leg while stepping the left foot out and back in for the timed interval.
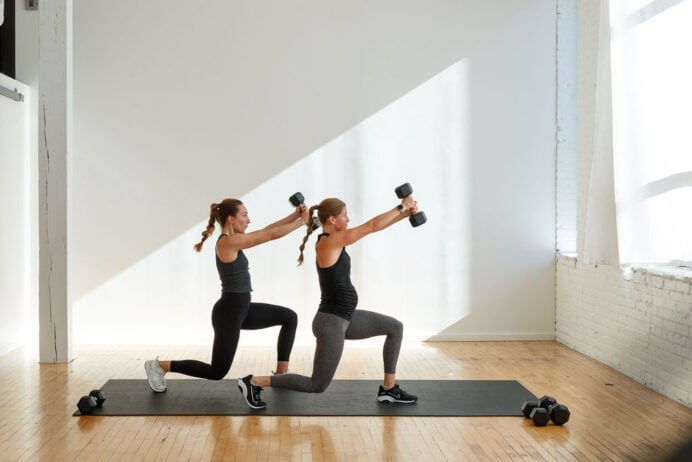
10. Reverse Lunge
Targets: Legs, glutes, quads, hamstrings and core.
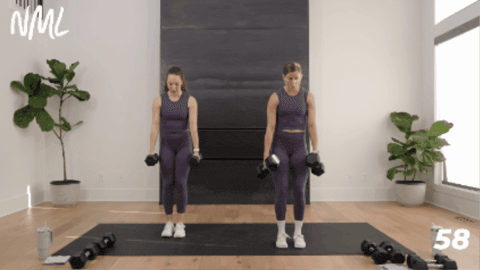
How to Do a Reverse Lunge
- Start standing in a neutral position, feet hip-width apart, holding a dumbbell in each hand, palms facing in towards each other (hammer curl grip).
- Step your left foot back into a reverse lunge. Lower your left knee towards the mat, aiming for a 90-degree angle in both knees.
- Hold for a moment, then drive through your front, right heel to return to standing.
- Alternate the movement, this time stepping your right foot back into a reverse lunge.
Modification: If lunges hurt your knees, try these exercise modifications.
11. Lateral Lunge
Targets: Glutes, quads, outer thighs and inner thighs.

How to Do a Lateral Lunge
- Start standing with your feet hip-width apart. Hold 1 dumbbell in your right hand.
- Take a large step to the left with your left leg as you sit your hips back, bending your left knee while leaving your right leg straight. Think of performing a single-leg squat with your left leg while your right leg remains straight. Knees and toes are pointing forward.
- Drive off your left foot to reverse the movement, standing back up to the starting position (as you pull your inner thighs together).
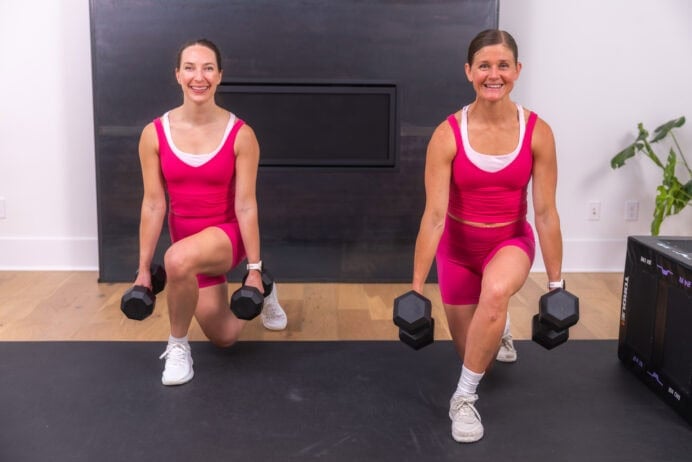
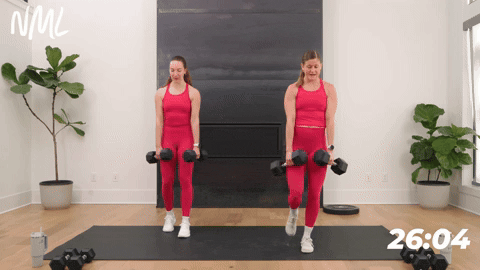
12. Curtsy Lunge
Targets: Legs, quads (thighs), gluteus maximus (butt), hip flexors and core.
How to Do a Curtsy Lunge
- Stand with feet hip-distance apart, holding a pair of dumbbells at your sides.
- Step your left leg back into a curtsy lunge (left knee should meet right calf) as your left knee lowers towards the mat. Lower your hips until both knees reach a 90-degree angle, front thigh parallel to the floor.
- Squeeze your right glute to reverse the movement, stepping your left foot back to center and standing tall.
- Repeat on the other leg, stepping your right foot back into a curtsy lunge before squeezing through the left glute to stand tall, returning to the starting position.
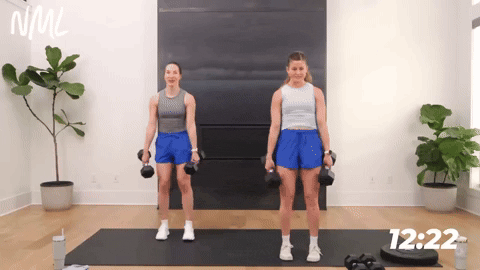
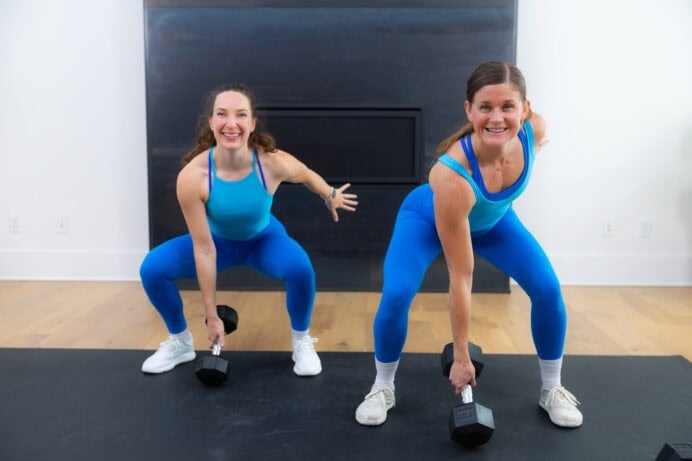
13. Single-Leg Deadlift
Targets: The posterior chain (backside of body), including the glutes, hamstrings, lower back and core muscles.
How to Do a Single-Leg Deadlift
- Start standing with feet hip-width apart, knees slightly bent. Hold a dumbbell in each hand in front of you at your thighs, palms facing in towards your body.
- Transfer your weight into your right foot and kickstand, or float your left foot off the ground, balancing on your right leg.
- With your right knee slightly bent, hinge at your hips, extending your left leg long behind you. Push your glutes back towards the wall behind you, lowering the dumbbells along the front of your thighs.
- Lower until you feel a stretch in your right hamstring (back of your standing leg) at the bottom of this movement. The range of motion looks different for everyone.
- Drive through your front right heel, squeezing your glutes and hamstrings to push your hips forward and stand tall, returning to a standing position. Bring your floating back left leg up to meet your right leg again.
Modification: Kickstand your non-working leg rather than letting it float. Keep 80% of your weight in your front leg and 20% in your back toes.
FAQs
What are common mistakes when doing hip abduction exercises?
You want to avoid using momentum instead of controlled movement. Be sure to properly engage the appropriate glute muscles throughout all repetitions and don’t compensate with other muscles. Maintain good alignment through the hips and a stable midline; rotating the hips or allowing the lower back to arch can greatly reduce effectiveness and cause strain.
What are the signs of weak hip abductors?
Some signs you may have weak hip abductors include hip drop when standing on a single leg or running, knees collapsing inward and poor balance. Chronic lower back, hip or knee discomfort can also be a sign and often involves a strained Iliotibial Band (IT Band) due to poor alignment and control or unbalanced strength.
Can hip abductor exercises help prevent injuries?
Strengthening your hip abductors is a great way to reduce your risk of injury by focusing on stabilization rather than strength training alone. Exercises that focus on standing hip abduction and side-lying hip abduction focus on the glute muscles, which help stabilize the pelvis, control leg alignment and strengthen the IT band – all of which help prevent common lower-body injuries.
Why should you train both hip abductors and adductors?
Training both hip abductors and adductors ensures you train both sides of a coin. This creates balanced strength around the hips, ultimately improving stability, control and overall movement efficiency. Training one without the other can cause an imbalance that could lead to chronic groin pain and knee instability.
How can hip abduction exercises improve running performance?
Many hip abduction exercises target the glutes, which help keep your pelvis stable while running by increasing hip strength. This allows better transfer of force with each stride by eliminating or reducing side-to-side movement and increasing your running efficiency.
More Workouts
Lower BodyPin This: Best Hip Abduction Exercises
This post includes affiliate links. I do earn a commission for products purchased using these links (at no additional cost to you). Thank you for supporting Nourish Move Love, making the content you see on this blog possible.
no comments
Leave a Comment